• Facebook
  • Instagram
  • Pinterest
  • Snapchat
  • Twitter
  • YouTube
  • Skip to primary navigation
  • Skip to main content
  • Skip to primary sidebar

MsMarmiteLover

  • Food
    • Recipes
    • Vegetarian
    • Vegan
  • Travel
    • France
    • Italy
    • Spain
    • UK
  • Wine
  • Gardens
  • Supperclubs/Events
  • About
    • Published Articles
    • Books
  • Shop
    • Cart

Smoked out

March 20, 2012 1 Comment Filed Under: Uncategorized

The Secret Garden Club held its second smoking workshop on Sunday March 18: the notes that follow reflect the activities of the day and vary slightly from the blog post following the first smoking day in November 2011.

Smoking is a technique which imparts a distinctive flavour to food and can also change its texture slightly. Our ancestors smoked food for its preservative effect, and while food which has been smoked will take longer to go off, these days, it is for the smoke flavour plus any aromatics that may have been added to the smoke mix, that makes the food so delicious.


We looked at three different methods of smoking food during the afternoon. Tea-smoking uses a mix of sugar, rice and tea leaves which are heated until they smoulder to produce a fragrant smoke which both cooks and flavours food.

Hot-smoking over wood applies heat to wood chips in order to cook food and to flavour it more strongly. Cold smoking involves exposing food to cool smoke for a much longer period of time, from several hours to a couple of days and will both flavour and preserve food without cooking it.

Tea-smoking uses a mix of tea leaves, brown sugar, raw rice and optional aromatics as the smoking medium. With the mix set in a pan under a steamer, the smoke generated infuses foods in the steamer basket with a delicate, elusive tea-smoke flavour.

Secret Garden Club tea-smoking mix:
Half a (US) cup of tea leaves (about 4 tbsp)
Half a (US) cup of brown sugar (about 4 tbsp)
Half a (US) cup of raw long-grain rice (about tbsp)

Mix the ingredients together, then make a foil saucer that fits into the bottom of the base pan. Pour the smoking mixture on to the foil (this is to protect the pan itself from staining), set it over the heat and fit the steamer basket and lid.

The trout fillets were laid on the steamer basket just as the smoke began to curl upwards through the slats, and steamed for around 20 minutes. Times will vary and our fillets were quite chunky. With fish, remove from the smoker as soon as they are opaque all the way through so that they don’t overcook. With tea-smoking, less is definitely more: over-smoke the food and you’ll be left with a distinct aftertaste of fag packet.

Hot-smoking over wood applies direct heat to soaked woodchips so that they smoulder gently. The wood and the food are both in a sealed unit so that the heat and smoke permeate the food to cook and smoke it at the same time. You can use the same equipment as for tea-smoking, above, ideally on an outdoor cooker. The process will produce much more smoke than with tea-smoking, so if you do have to hot smoke over wood indoors, open all windows and doors first and turn up your extractor fan – although you will probably set off your smoke alarm even so.   

Important: when smoking food with any kind of wood, it is vitally important that the wood is raw, and untreated. Any sort of treatment, coating, glue or varnish will give off potentially toxic fumes when smoked – NOT what you want coating your food. If the wood you want to use has been cut with a chainsaw, beware – there could easily be oil residues on the wood from the chainsaw. It’s highly satisfying to use wood that you have chopped or sourced yourself, but you must be 100% certain that the wood is free of any chemicals. 

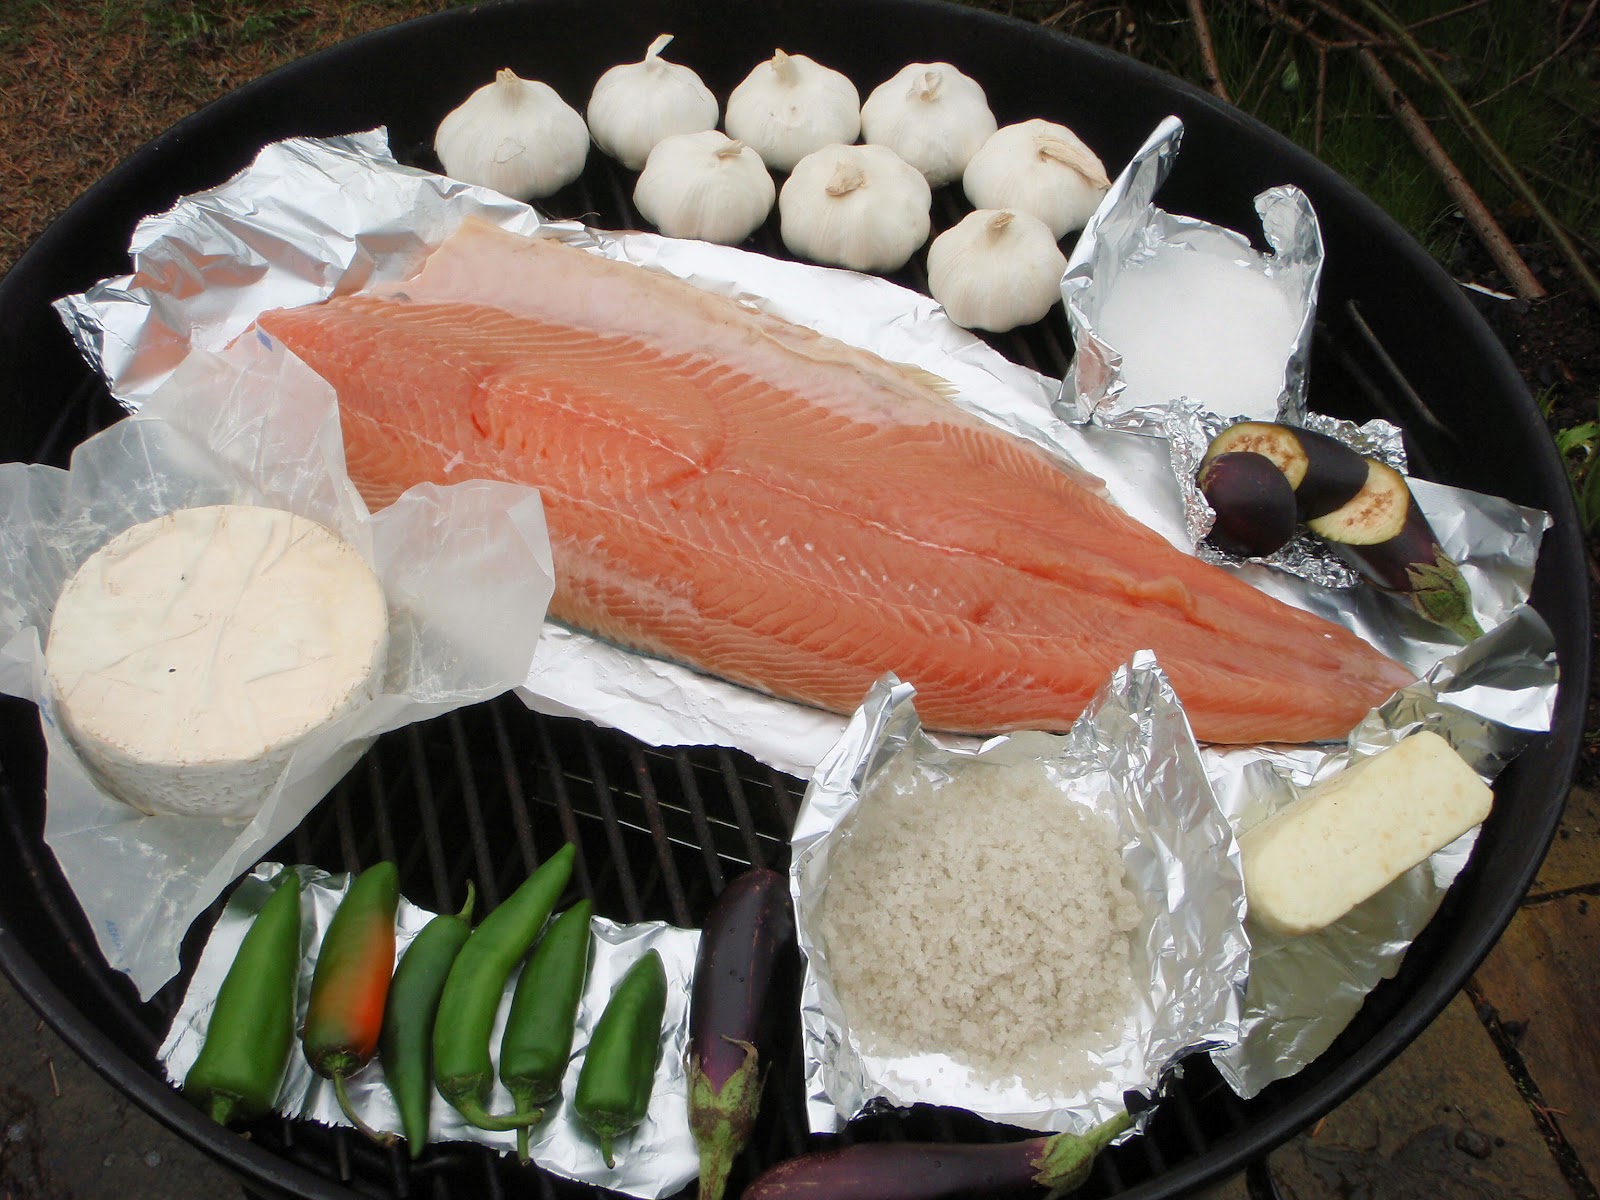
We used a proprietary hot-smoker – very similar to this one – set up outside on the terrace. 

  • Sweet peppers, sliced in half and with seeds removed;
  • Lemons, cut in half;
  • Tofu, cut into thick slices and marinaded for two hours beforehand in soy sauce and maple syrup;
  • Sweetcorn, on the cob;
  • Halloumi cheese
These were all smoked over hickory chips for 25-30 minutes. It’s well worth experimenting with different types of wood, so long as you stick to hardwoods. We were asked on Sunday about smoking with pine to get that distinctive resinated flavour. But pine, and also cedar, contain too much in the way of tars and resins to smoke successfully and can even ruin your smoker. Fruit woods, such as pear, apple, or cherry, are all popularly used for smoking. Oak, beech and hickory are also classic smoking woods.
Marinade for tofu
3 tbsp soy sauce
3 tbsp maple syrup
2 tsps olive oil
Half a teasp of English mustard 
Whisk all ingredients well together. This was also used to glaze the sweetcorn immediately prior to smoking.
Cold-smoking is the technique we associate most with fish (smoked salmon, smoked mackerel, smoked haddock) and meat (smoked bacon). However, it’s also used to smoke cheese (such as applewood-smoked cheddar) and bulbs of garlic. When you expose food to cold, or cool, smoke, the food does not cook, although the smoke will penetrate the food more thoroughly than when hot-smoked. 

Fish (and meat) will need to be salted, or brined, before it is cold-smoked. To salt, say, a side of salmon, find a baking tray on which the salmon will fit  comfortably. Spread a layer of rock salt on the base of the tray.  Lay the salmon, skin side down on the rock salt, and cover completely with more salt. Other aromatics can be added as well: lemon slices, herbs, beetroot, some gin or vidka maybe. Now place a second baking tray on top of the salmon and salt, and weight it down by placing tins or full jars on the top. Slide the whole lot into the fridge and leave for 12-24 hours. 
Remove the salmon, reserving the salt mixture and drain away any liquid generated during this first salting. Turn the fish over on the rock salt base, so that it’s now skin side up. Cover again with salt and aromatics (you may need more). Weight down again as before. Put the tray and salmon combo back in the fridge for another 12-24 hours.
Brining it creates a sweeter cure: make up a salt/sugar solution in cold water, completely immerse the fish in this and store, covered, in the fridge for around 8-12 hours. (Smaller fillets may take less time.)
Simple brine
100g brown sugar
75g salt
1 litre water
Plenty of other flavours can be added to this, eg, fennel, onions, garlic, herbs. Or go Asian with star anise, cinnamon, lemongrass or lime.
Once salted/brined, rinse the fish well to get rid of excess salt, then dry it, ideally for a couple of hours or so, in a cool, well-ventilated place. Only then it is ready to smoke. We also smoked Camembert cheese, salt, aubergines and garlic bulbs – these do not need brining or curing but can go straight into the cold smoker.

With cold-smoking, the challenge is to generate smoke that is cool when it reaches your food. The ideal temperature range in the smoker is between 26 and 30 degrees Celsius (80-90 degrees Fahrenheit). If the temperature exceeds 37 degrees C (100 F), then the fish will get too warm. It will lose moisture and may start to cook.
An obvious way to do this is to burn your wood in one place, channel the smoke through piping so that it cools as it goes, and direct it into a smokehouse. But if you just want to try out some cold-smoking, this is quite a cumbersome operation. Remember also, your fire needs to burn wood only (see warnings about wood-burning, above), and your piping and smokehouse should be lined with non-reactive material.
A second solution is to generate the smoke from as small a heat source as possible. We used a ProQ smoke generator, available online from Mac’s BBQ, and Amazon among other places, placed in the bottom of an ordinary kettle barbecue. If you don’t have a deep barbecue, you could try making a smokehouse out of an old fridge, or a discarded filing cabinet (popular because the file rods are handy to hang fish fillets from), or even a cardboard box (while the smoke should be cool when it reaches the box, place the smoke generator itself on foil or something non-reactive and fireproof).

The ProQ is filled with smoke dust in a spiral pattern. The outer ring of the spiral is heated by a  small tealight which can then be removed when the wood dust starts to smoulder. It will continue to smoulder for up to ten hours. It’s an effective, tidy way to generate cool smoke, although we found that it didn’t always produce very much smoke. Two ProQ smoke generators would probably be ideal, but expensive.

If you don’t want to shell out for commercial kit straightaway, try the tin + soldering iron method instead. For this you need a deep container, again such as a kettle barbecue, a soldering iron, an empty 400g food tin, and your woodchips. For this method you’ll also need access to a power supply.

Important: the soldering iron must have no solder on it AT ALL. You do not want smouldering lead contaminating your woodsmoke. Ideally, buy a new soldering iron for about a tenner and use it exclusively for cold-smoking.
Also note: many food tins these days, especially supermarket own-brand cans, are lined with a plastic coating. You should use an unlined tin – Baxter’s soup cans are unlined, for example.
Before you empty the contents of the tin, make a hole in it at the top end (we used a sharpening steel and a hammer), opposite the ring-pull if there is one. The hole needs to be just big enough to fit the tip and arm of the soldering iron. This is much easier to do when the tin is full; the lid tends to buckle and collapse if you empty the contents first. Wash out the tin, and let it dry.
Using the ring-pull, carefully peel back the lid of the tin about half way. Fill just over half the tin with your wood chips. Close the lid as far as possible, then push the soldering iron through the hole so that it’s fully inserted in the tin and the arm is in direct contact with the woodchips. 
Put the tin with the soldering iron inserted in the bottom of the barbecue. Lay the food to be smoked on silver foil on the top rack. Carefull trail the soldering iron’s cable out of the barbecue and plug into the power supply. Place the lid on the barbecue as tightly as possible allowing for the fact that the soldering iron cable will prevent it from closing fully. Switch on the power to the extension cable. You should start to see wisps of smoke emerge from under the lid within 5 mins.


With the soldering iron and tin at the bottom of the barbecue and the food laid out at the top, the smoke around the food should stay cool enough to cold smoke properly. If you have an outdoor thermometer, it’s a good idea to place it on the rack next to the food, so that you can check the temperature regularly. On a sunny day, the outside temperature may heat up the interior of the barbecue. If you do see the temperature rising much above 30 degrees, slide a bag of ice into the bottom of the barbecue next to the tin of woodchips. This should bring the temperature down to the safe range and keep it there.


While the woodchip tin is smoking, prepare a second one. The tins will last about 90 mins to 2 hours, so, when the first is exhausted, unplug the soldering iron, remove it and the tin from the barbecue, and switch the soldering iron from tin 1 to tin 2. Tin 1 can now be emptied and reused.
Smoking workshop March 2012
Menu

Rum punch with smoked lemons
Smoked trout salad
Halloumi salad with tomatoes
Smoked marinaded tofu
Smoked red peppers
Smoked sweetcorn
Smoked aubergine curry
Selection of smoked cheeses

Recent posts

Soup recipes for a broken arm

February 26, 2025

The future of farming

January 20, 2025

Poppy seed kifli pic: KERSTIN RODGERS

Hungarian poppy seed pastry ‘Kifli’ recipe

November 5, 2024

Previous Post: « Conversation, Catherine and the Caribbean
Next Post: Book Review: Sweet peas for Summer »

Reader Interactions

Comments

  1. Sophie

    April 14, 2012 at 8:29 am

    Thought you might find the following interesting:

    http://north19.co.uk/christmas-tree-cooking-pine-smoked-mussels/#more-724

    Reply

Leave a Reply Cancel reply

Your email address will not be published. Required fields are marked *

Recipe Rating


Primary Sidebar

MsMarmiteLover aka Kerstin Rodgers.

Chef, photographer, author, journalist, blogger. Pioneer of the supperclub movement.

This is my food and travel blog, with recipes, reviews and travel stories. I also stray into politics, feminism, gardening.

Kerstin Rodgers/MsMarmiteLover

msmarmitelover

Went with influencers to @standrewslakes in Kent w Went with influencers to @standrewslakes in Kent with @ourfinland @lakelandfinland @pcagency to experience Finnish food such as Karelian pies with egg butter, cinnamon buns, blueberry pies, and pea soup which they have with mustard and sour cream. We did zip lining, kayaking, saunas, whipped ourselves with birch sticks, ate in a gorgeous wooden bbq shed @arctic_cabins at the end of all this activity we were all tired but happy. @miramakeup @holidaywiththeheathers @amie_jane__ @onehungryasian @iamtimchung @travellingtuesdays @helimendetravels @charlotteemilyprice #presstrip
@camille.osullivan @camilleosullivanpics and @grah @camille.osullivan @camilleosullivanpics and @grahnort @wiltonsmusichall god this woman is talented. She did a solo show of The Rape of Lucrece. Her voice! #theatre #shakespeare #london
My latest article on Hungarian cuisine, a unique m My latest article on Hungarian cuisine, a unique meeting of east and west, for @ckbk It's a blend of Ottoman, Eastern and middle European, Austro-Hungarian empire and cowboy food. #food&travel #foodanthropology #hungary
Made Fermented Cucumber dill pickles from @nickvad Made Fermented Cucumber dill pickles from @nickvadasz book The Pickle Jar. At @katzsdeli in New York they sell half sours and full sours. I reckon these are 3/4 sour. The white mould is fine btw. These are delicious #pickleperson #fermentation #guthealthy
London in bloom: wisteria, cherry blossom, lilac, London in bloom: wisteria, cherry blossom, lilac, plum blossom, 🌸 you don’t need to go to Japan for the Sakura season- it’s all here- london at its most beautiful. #london
Bluebell walk on Wanstead flats. The scent is incr Bluebell walk on Wanstead flats. The scent is incredible: similar to lily of the valley. These are actual English bluebells - a deeper colour & more delicate than Spanish bluebells which are rather invasive. #london #walks #april #bluebells
Snapshots from portobello rd market. Portuguese fo Snapshots from portobello rd market. Portuguese folar de pascua bread from Lisboa patisserie,  a gorgeous mosaic table from Fez, my favourite antique shop @muirshindurkin, Alice’s shop, an Easter hat, the best wisteria I wrote a substack on portobello road: https://open.substack.com/pub/kerstinrodgers/p/where-to-go-in-portobello-road-the?r=3873k&utm_campaign=post&utm_medium=web&showWelcomeOnShare=true #london
I visited @tokyobagellondon with my granddaughter I visited @tokyobagellondon with my granddaughter yesterday to try one of their viral wobbly bunnies. We also tried the multi layer Oreo pancake cakes, the onigiri shaped croissant. My sister had the black sesame latte and I had yuzu tea. I spent £35 in a short space of time as each dessert was £5 but it was a fun experience. Ophelia said ‘lovely flowers’ which shows a degree of sophistication for a 2 year old. I preferred the strawberry to the coconut flavour . #londondaysout #grandmacore #easter
A quick high protein lunch of ratatouille with smo A quick high protein lunch of ratatouille with smoked tofu.  @pomoragoodfood olive oil then an aubergine cut into thick slices then quartered. Fry till translucent then add the chunks of red pepper. 2 fat garlic cloves sliced thinly, a block of smoked tofu in chunks, 2 bay leaves, a small handful of maldon salt. A courgette cut into thick half lengthways- then sliced into half moons. I might chuck in a handful of pantelleria capers in vinegar to give some acidity. Serve hot or cold. #sololunch #protein #vegetables
Inspired by @nickvadasz book The pickle Jar I used Inspired by @nickvadasz book The pickle Jar I used his dill pickles to make one of my favourite recipes for lunch - a potato, sour cream & pickle soup. Recipe on the blog. #soup #pickles
One of my favourite ways to eat mushrooms. Cook wh One of my favourite ways to eat mushrooms. Cook whole button mushrooms in olive oil, lemon juice, a little white wine vinegar, salt, bay leaves, whole coriander seeds, thyme, and white wine if you have it to hand. I used @pomoragoodfood olive oil. You can eat it straight away or leave it to marinate longer and eat the next day. #vegetarian #vegan #mushroomrecipe
Table side Caesar salad @maisonfrancois for @sienn Table side Caesar salad @maisonfrancois for @siennamarla birthday 🎂 #london #restaurants #caesarsalad
I went to sheffield to visit the @reclaimedbrickco I went to sheffield to visit the @reclaimedbrickcompany to look at their hand cut, wire cut and tumbled bricks for a herringbone patio. I love the historical aspect of bricks, the different quarries from different parts of the country. #patio #englishhistory story
Made brussel sprouts with pistachio pesto. The pis Made brussel sprouts with pistachio pesto. The pistachios came from Brontë in Sicily- they are the best pistachios in the world. You can make pesto with any nut: it’s usually with pine nuts but I’ve used hazelnuts, almonds (trapani), walnuts. #vegetarian #pesto #bronte
Bathroom palette: @firedearthuk scallop tiles @top Bathroom palette: @firedearthuk scallop tiles @toppstiles honed white marble skirting and dado @paintandpaperlibrary paint @sanderson1860 wallpaper this is my first rodeo when it comes to bathroom design. Follow my progress
Yesterday I cooked ( needed help with heavy pans a Yesterday I cooked ( needed help with heavy pans and pouring) pesto alle genovese. Made pesto in the vitamix: fresh basil leaves, 4 cloves garlic, 100g pecorino, 100g pine nuts, 150ml olive oil, salt, and juice of half a lemon. Whizz up.  Then cook the pasta - traditional shape is trofie but I only had fusilli. Top with small boiled potatoes and steamed green beans. Douse again with olive oil and more pine nuts. I served this with green salad with cucumber, avocado, pumpkin seeds and a mustard lemon olive oil dressing. #familylunch #sundaylunch #pestopasta #pestgenovese
Unstyled food photos no.4: butternut squash soup. Unstyled food photos no.4: butternut squash soup. Peel and cut up the butternut squash. Discard the seeds. Roast with olive oil, salt, smoked paprika in the oven for 30 minutes. Soften 2 brown onions in a deep pan with olive oil, add 3 cloves garlic minced, 3 bay leaves. Then add the veg stock powder and 1.5 litres hot water to the pan. Stir. Pour in the roast butternut squash. Cook for 10 minutes. Then remove the bay leaves and blend. Add 3 large scoops of natural yoghurt or skyr. Season to taste. Transfer back to the deep pan and serve with grated cheese, pumpkin seeds, chilli. 🌶️ #vitamix #soup #winterfood #agacooking
Unstyled food photos #3: roast cauliflower & garli Unstyled food photos #3: roast cauliflower & garlic cheese soup. Roast the cauliflower florets, unpeeled garlic cloves, one chopped brown onion in olive oil. Once golden, tip into a saucepan with a potato chopped small, 3 tbsps veg stock and 1.5 litres hot water. Boil till soft the. Add 100g cheddar. Stir then blend in a blender. Serve with grated cheese on top. #soup #vitamix #winterfood #cookingwithonehand #simplerecipes
Unstyled food photos: whole roast cauliflower with Unstyled food photos: whole roast cauliflower with ground almond crust, yoghurt, cumin, lemon juice and tahini sauce using @pomoragoodfood olive oil. First I parboiled the cauliflower then roasted it for 30 to 30 minutes with salt and olive oil in the oven. Add the ground almonds and bake for another 10 minutes. Then serve hot with the sauce. #highprotein #lowcarb #vegan #vegetarian #glutenfree
Unstyled food photos: carrot and preserved lemon s Unstyled food photos: carrot and preserved lemon soup. I’m eating a lot of soup as it’s easy to make with one hand and a vitamix. I roasted the carrots ( 1 kilo) in olive oil. Then boiled them with 2 tbsp veg stock, 1 tsp ground coriander, 1 tsp ground cumin and 2 litres hot water. For a thicker soup, add 1 tbsp of cornflour mixed with the stock juice and add. Once tender, I blended this with 2 whole preserved lemons, adding a little of the juice from the jar. Blend on medium then high. Serve with yoghurt. It’s a way of effortlessly eating a lot of vegetables in one meal. #winterfood #soup #vegetables
Load More... Follow on Instagram

Archives

Copyright © 2025 msmarmitelover