• Facebook
  • Instagram
  • Pinterest
  • Snapchat
  • Twitter
  • YouTube
  • Skip to primary navigation
  • Skip to main content
  • Skip to primary sidebar

MsMarmiteLover

  • Food
    • Recipes
    • Vegetarian
    • Vegan
  • Travel
    • France
    • Italy
    • Spain
    • UK
  • Wine
  • Gardens
  • Supperclubs/Events
  • About
    • Published Articles
    • Books
  • Shop
    • Cart

How to make a sourdough loaf in 15 easy steps

September 25, 2013 31 Comments Filed Under: Food, Recipes, Uncategorized

Gluten! We loves it. Emmanuel Hadjiandreou.

This is following Emmanuel Hadjiandreou’s technique. Which has worked like a dream for me. The great thing about his method is there is none of this throwing half the starter away rubbish. You don’t have to waste flour. I always hated having to throw away starter.
Why is this? Effectively, once you have your live mother, you keep it in the fridge and just use a tiny bit every day to make a poolish or pre-ferment. (Yes poolish is connected to Poland. The person that invented this technique was a Polish baker living in France. Actually the French invented sourdough, someone took that to San Francisco, where they perfected their own sourdough). 

As stated in the last post How to cure a sick mother, you have taken 5g of your starter, and added 50g of flour (rye is best to get it going again, white is fine too) and 50g of luke warm water. You’ve covered it and left it over night.
You now have 105g of sourdough starter. But overnight your starter will have lost 10g so call it 95g.

What to do now?
1) Now take 75g of it. Put the rest back in the fridge. If you are not baking again for a while, you can add it back to your original revived mother. (If you are going to bake again very soon, you can keep the 20g and feed it with 50g of flour, 50g of water, leave overnight, do the whole cycle again.)

Get out your digital scales. Because you have some don’t you? Seriously you need to buy these for any attempt at efficient baking. They don’t cost much. I know my American readers are resistant to scales but look! You can buy them in America too! Only 25 bucks! You can change them from ounces to grams just for this recipe.
Babes, I want you all to be gram perfect. I want you to become anal about weighing. 
2) In a large bowl, add 150g of warm water to the 75g of sourdough starter.
Mix well. 
3) In a separate bowl add 250g strong white flour
4 g salt.
Mix well.
4) Add the flour/salt mix to the sourdough/water mix.
Mix well.
Leave for 10 minutes, covering with the other bowl. 
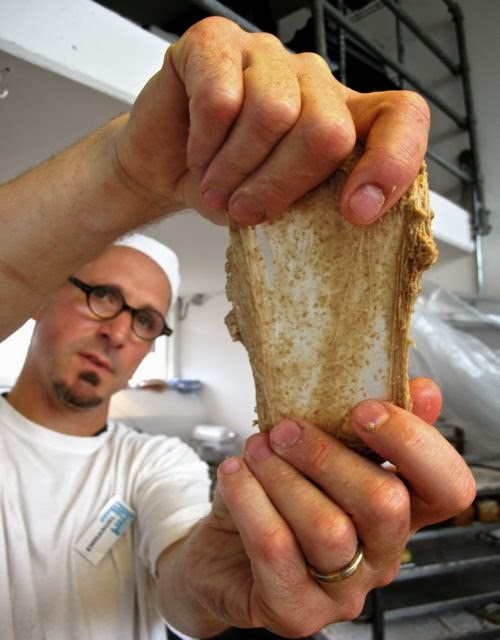
5) Then, ideally using a scraper, or your hands, start to shape the loaf.
(This is what baker Emmanuel Hadjiandreou does instead of kneading. But it works.)
Pull the side of your ball of dough outwards then tuck it into the centre. Moving the bowl around as you go, you do this 10 times going around the ball of dough.
If it starts to become stiff and the dough tears, then stop. 

6) Wait for the dough to relax for ten minutes, then do the pulling into the centre kneading technique again. Do this four times in total with a ten minute interval in between. 
At the end of this you should have a nicely smooth ball which is strong in structure and will rise.
Make sure you have scraped all the dough from the sides of the bowl into your round ball of dough.

7) Rest it for one hour.

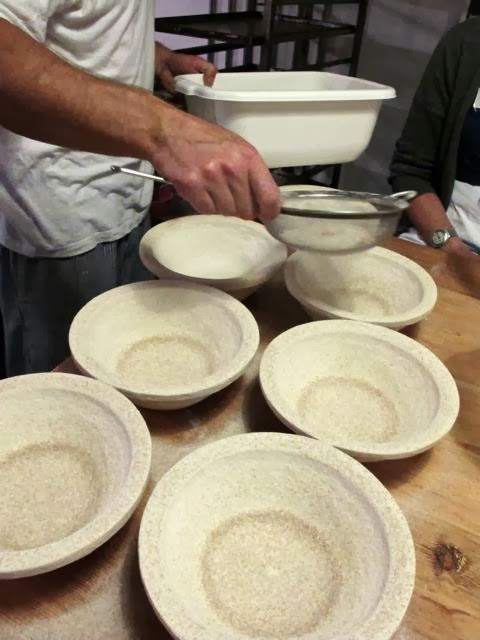
8) Prepare your proving basket (I found this type works well, it ain’t pretty like the others but the dough doesn’t stick) or use a colander lined with cheesecloth, or a bread basket lined with a non-fluffy tea towel, by dusting it liberally, up the sides too, with wholemeal or rye flour. If you’ve only white flour, use that. This must be well coated with flour as you don’t want your loaf to stick.

9) Dust the dough ball with wholemeal or rye flour (or white if you have nothing else).
Scoop it into your already prepared proving basket or the cheesecloth lined colander. 
10) Then leave this to proof for 3 to 6 hours or overnight or until doubled in size.

11) Preheat your oven to 250C. Place a shallow tray in the bottom and a flat baking tray in the middle.
12) When hot:
Place the dough ball, flipping it over, onto a pre-heated baking tray, dusted with semolina. 

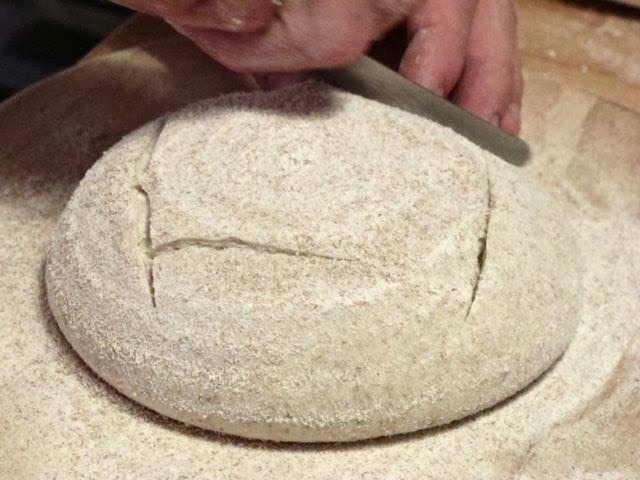
13) Slash the top with a corrugated knife. (I always forget this.)

14) Bake at 250C, adding a cup of tap water into the hot tray placed into the bottom of the oven. This creates steam and gives you a crust.
After 10 minutes lower to 220C. (If you have an Aga, put in the cool shelf.)
Bake for 30 minutes in all.
Knock on bottom, it should sound hollow. You want a deep bassy sound. Emmanuel thinks we underbake loaves in this country. 

15) Place on cooling rack.
When cool, slice and enjoy. If you are impatient and can’t wait till it cools, don’t slice from the middle, slice from the end. While it’s cooling you see, it’s still baking inside, even though it isn’t in the oven. 
Good resources in the UK: 
Equipment: 
Bakery Bits (ships worldwide)
Richard Bertinet
Lessons:
Emmanuel Hadjiandreou and others in:
North West London at The Baking Lab
or Nottinghamshire at the School of Artisan Food 
Bath: Richard Bertinet 
Near Edinburgh: Andrew Whitley’s Bread Matters
London and other places: Jane Mason’s Virtuous Bread
Northhampton: Juniper and Rose cookery school (lessons by Dan Lepard and Vanessa Kimbell)
Flour:
Shipton Mill
Doves Farm.
A note: The teen made her first sourdough loaf last week using this method. I do believe, after learning to read, write, count, use a computer, that teaching your kids to bake bread is one of the most useful things a parent can do for a child. It should be obligatory at school. 
I do recommend getting a hands on lesson if you can afford it. It made all the difference for me. 

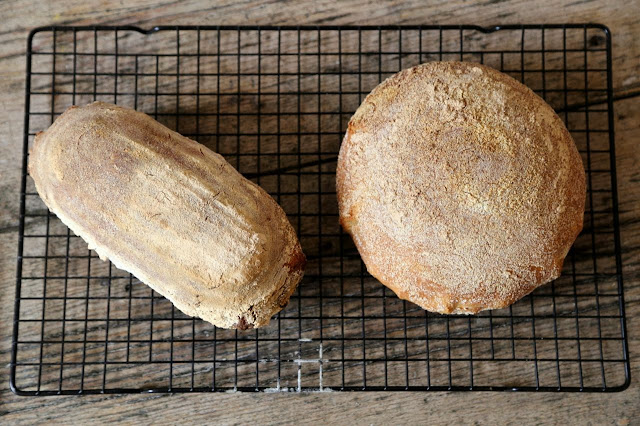
I baked these this morning. Yeah I forgot to slash again.

Recent posts

Competition to win a Master series Microplane gift set

September 29, 2023

Dutch Baby apple and cheese pancake

September 17, 2023

La bomba paella rice

August 25, 2023

Previous Post: « How to cure a sick mother
Next Post: Recipe for pickled walnut and blue cheese salad »

Reader Interactions

Comments

  1. Mamacook

    September 25, 2013 at 12:15 pm

    I used to work in a bakery. It's a really good idea to slash them because you get a more even and often better rise in the oven. You do have to use a really sharp serrated knife and be confident with it.

    Reply
    • Kerstin Rodgers

      September 25, 2013 at 4:33 pm

      It's not lack of confidence, I literally forget every time.

      Reply
  2. Debs Dust Bunny

    September 25, 2013 at 12:55 pm

    More timely advice! Thanks.

    Reply
  3. Gloria

    September 25, 2013 at 6:04 pm

    I always had a problem with my dough spreading out and not having much oven spring (the initial burst of rising when the heat hits the dough and it begins to bake). My oven isn't up to scratch basically, so now I always use a cast iron lidded pot (think some people call them Dutch pots), so creating an oven in my oven.

    I put the pot with lid in the oven to heat up. Once oven reaches temperature, I tip the dough into the pot, slash the top if I remember to, replace lid and bake at 250C for 35 mins, then remove the lid, lower oven temp to 220C and bake for further 25 mins.. I make a loaf twice the size of the one in your recipe, so that's why the baking times longer, so adjust to suit a smaller loaf. I get really reliable results this way and great oven spring.

    Reply
    • Kerstin Rodgers

      September 25, 2013 at 9:38 pm

      I did the Dutch oven technique for a while but with Emmanuel's technique I now have well structured loaves that don't spread out into pancakes. I like this size loaf, it's perfect for someone living alone too!

      Reply
    • Gloria

      September 28, 2013 at 8:26 am

      I'm very fond of my retro English Electric 60's oven (with teal coloured splashback) and I've learnt how to get good results from it. No doubt most people are more up to date than I am and have ovens that are more efficient.

      Reply
  4. IzzyB

    October 1, 2013 at 2:39 pm

    Thank you twice over – for the chef-resurrection advice and also for this recipe, both of which worked a treat. So little effort compared with other sticky-sourdough-up-to-the-elbows experiences I've had. Plus a really great crust.

    Reply
    • Kerstin Rodgers

      October 2, 2013 at 4:21 pm

      Yay! I'm so glad it worked for you.

      Reply
  5. toko sepatu grosir

    October 3, 2013 at 4:24 pm

    Great, thats look easy steps. Thanks 😉

    Reply
  6. Abe

    September 4, 2014 at 11:00 am

    Thanks for that. Just want to point out that the French did not invent sourdough. Sourdough goes back to ancient Egypt. Before sourdough was discovered they only ate unleavened bread. Then in Ancient Egypt it was discovered that flour and water mixed together and left for a few days began to bubble and rise. Leavened bread was born. Yes, many methodologies have been invented over the years of which Poolish is one but by no means does this mean Sourdough is French.

    Reply
  7. Anonymous

    November 12, 2014 at 7:34 am

    Hi, can you explain what do you mean by doesn't need to throw away half of the starter? Do you mean in the process of culturing the starter we dont need to discard any at all? At which day of the starter can I start this? Thanks.

    Reply
    • theundergroundrestaurant

      November 12, 2014 at 11:00 am

      Once you have a starter, however long it has taken you to make, or get one from someone else, usually the technique is to keep 'refreshing' it by throwing away most of it and adding flour and water. With this technique, you make a pre-ferment and you need very little starter to get a pre-ferment going. Literally a few grams.

      Reply
    • Anonymous

      November 12, 2014 at 11:04 am

      Hi,

      Can I ask you at what stage you're at. Do you wish to make a starter or do you have one and wish to bake with it?

      In the process of making a starter, and keeping it, many find they have to discard to stop building too much. But with careful management we can keep this to a minimum or not at all. Depends on how often you bake and how you use it.

      If you wish on more advice then feel free to ask.

      Reply
    • theundergroundrestaurant

      November 14, 2014 at 6:11 am

      Gee thanks for the patronising comment

      Reply
    • Anonymous

      November 14, 2014 at 6:41 am

      Do you mean my comment replying to original question by Anonymous!

      Reply
    • theundergroundrestaurant

      November 14, 2014 at 8:01 pm

      I didn't realise you were replying to another Anonymous! Sorry! (why is everyone bloody anonymous anyway?)

      Reply
  8. Sepatu Adidas

    February 13, 2015 at 7:44 am

    Great, thats look easy steps. Thanks 😉

    Reply
  9. Aj

    August 13, 2015 at 10:33 am

    late posting:
    The starter has to be fairly active to get the major ferment going, which is why I thought folks kept it refreshed…. and wasted a lot of flour…..
    going to give it a go as I am a Dutch pot user, my freestyles blow out one side…. not a good look.
    Good stuff K

    Reply
    • Kerstin Rodgers aka MsMarmiteLover

      August 14, 2015 at 9:49 pm

      Haha…yeah mine aren't beautiful shapes either. Got to back on the sourdough thing this autumn. Too darned hot right now.

      Reply
  10. Ally Lake

    August 17, 2015 at 6:22 pm

    Do you have a gluten free sourdough recipe?

    Thanks

    Reply
    • Kerstin Rodgers aka MsMarmiteLover

      August 17, 2015 at 7:10 pm

      I don't, I'm sorry. I've made gluten free bread once, using Doves gluten free flour. It made me feel extra sorry for all the coeliacs!

      Reply
    • Abe

      August 17, 2015 at 7:11 pm

      I'm never sure about Rye. Is rye OK?

      Reply
    • Kerstin Rodgers aka MsMarmiteLover

      August 17, 2015 at 8:02 pm

      Rye has gluten in it. But you can make sourdough with rye.

      Reply
    • Abe

      August 17, 2015 at 8:14 pm

      If sourdough rye is OK then should be quite easy. The trick with rye is very high hydration and make it like a cake. Prepare your rye starter, mix everything into a batter, go straight into final proofing and bake. You need to go as high as 90% hydration. So off the top of my head…

      500g rye flour
      442g water
      10g salt
      150g mature rye starter at 100% hydration

      Prepare your rye starter the night before: 30g starter + 60g rye flour + 60g water

      Next morning…

      In your dough bowl mix the 150g mature rye starter into 442g water.
      In another bowl mix the 500g rye flour and 10g salt then add to the starter/water mix.
      Stir until completely incorporated and its a thick batter.
      Then transfer to suitable loaf tin and smooth over.
      Then go straight into final proofing. When small wholes begin to appear on top it is ready to bake in a preheated oven. But don't wait till too many appear.
      Or you could sprinkle with rye flour after you have transferred it into a loaf tin and when it rises the flour will crack and look like a map. It'll be ready to bake.

      I think I have an all rye sourdough with raisins recipe which I'll have to find. I'll post it asap.

      Reply
  11. Abe

    August 17, 2015 at 8:40 pm

    Raisin Rye Bread by Emmanuel Hadjiandreou

    INGREDIENTS:

    150g dark rye flour
    100g rye sourdough starter
    200g + 1 tablespoon cold water
    200g dark rye flour
    6g salt
    200g sultanas / golden raisins
    150g hot water (not boiling, hot!)

    900g loaf pan greased.

    METHOD:

    1. In a bowl mix the 150g dark rye flour + starter + 200g and 1 tablespoon water. Cover and leave to ferment overnight. This is the wet mixture.

    2. Next day… In another bowl mix the 200g dark rye flour + salt + sultanas. This is the dry mixture.

    3. Tip the dry mixture into the wet mixture. Do not mix yet!

    4. Carefully pour the 150g hot water over the dry mixture.

    5. Quickly mix together and form thick batter.

    6. Spoon the mixture into prepared loaf pan.

    7. Dip plastic scraper or spoon into water and smooth over.

    8. Cover and let rise for about 2 hours.

    9. About 15 minutes before baking preheat oven to 240C (475F). Place a roasting pan on the bottom of the oven to preheat. Fill a cup with water and set to one side.

    10. When the dough has finished rising remove the covering.

    11. Place the loaf in preheated oven, pour the cup of water into the roasting pan and lower the temperature to 220C (425F).

    12. Bake for about 30 minutes or until brown.

    13. Take the loaf out of the pan and set on wire rack to cool.

    14. Bon Appetite 🙂

    Reply
  12. Ovy Ortega

    July 14, 2016 at 6:33 pm

    I tried Hadjiandreou's starter method. I did the tablespoon from the mother and added 1 cup of flour and 2/3 water. Bubbled beautifully but then as a dough (in both proofs using Ed Wood's recipe) it did not rise. Only rose a bit in the final baking, and that not much.

    Reply
    • Kerstin Rodgers aka MsMarmiteLover

      July 16, 2016 at 5:34 pm

      hmm. I know what you mean. After a while I had the same problem. I'm not sure why.

      Reply
    • Abe

      July 16, 2016 at 5:45 pm

      If the starter bubbles then the bread will rise. However there are so many variables one must take into account…

      1. Are you allowing the starter to mature enough?
      2. Going by the dough and not the clock have you allowed enough time for the bulk ferment?
      3. Again, judging by the dough and not the clock, have you allowed enough time for final proofing?

      Judging by the minimal info given it sounds as if you've under done the starter build or bulk ferment. Everyone's starter is unique and you need to learn what the starter and dough, looks and feels like, during each stage.

      As a very brief guide you should do the following…

      1. Starter should peak and just begin to fall.
      2. Or you can drop a bit of starter into some water and see if it flats.
      3. The dough should have full gluten formation and be aireated before going onto final proofing.
      4. Gluten formation is done when you gently press the dough and it springs back immediately.
      5. It'll have fine veins in the dough.
      6. It'll be billowy but not necessarily doubled.

      Try and try again. Best of luck.

      Reply
  13. Julie Wyatt

    January 5, 2018 at 5:13 pm

    I have made bread from this recipe and it has been good !! But there is one thing I am not certain about….I keep the 'mother' in the fridge and have had it for 2 moinths now without problem and when I want to make bread, I take 15g and mix it with 150g flour and 150g warm water to create the 'poolish'. However, as I only makee one loaf at a time, I have loads of 'poolish' left. Do I just throw this away ?

    Reply
  14. Julie Wyatt

    January 5, 2018 at 5:16 pm

    I have made bread with this recipe and it is very good but I have one little area where I am not clear:

    I use 15g of 'mother' mixed with 150g flour and 150g warm water to create the 'poolish' but as I only make one loaf at a time, I have too much 'poolish'. What do I do with this, throw it away?

    Reply

Trackbacks

  1. My Corona lockdown and cupboard essentials says:
    May 7, 2020 at 5:52 pm

    […] to add interest to porridge or rice pudding. Flour and yeast. If you can’t get yeast start making your sourdough. Use the discard for pancakes and pizza […]

    Reply

Leave a Reply to theundergroundrestaurant Cancel reply

Your email address will not be published. Required fields are marked *

Recipe Rating


Primary Sidebar

MsMarmiteLover aka Kerstin Rodgers.

Chef, photographer, author, journalist, blogger. Pioneer of the supperclub movement.

This is my food and travel blog, with recipes, reviews and travel stories. I also stray into politics, feminism, gardening.

Subscribe to my mailing list

msmarmitelover

Kerstin Rodgers/MsMarmiteLover
Apple rose blossom tarts with rose jam. Rose Appl Apple rose blossom tarts with rose jam.  Rose Apple Blossom Tarts

Serves 8

Equipment: 
Microwave
Cupcake or muffin tin

I use a red-skinned apple to make these, to get a hint of blush at the edges of the ‘petals’.

Ingredients:
4 Pink Lady or Royal Gala apples, cored, cut into quarters, sliced thinly into half moons
1 lemon, squeezed
1 pack all butter readymade puff pastry 320g, on a roll, cut into 8 strips about 6 cms long
100g of melted butter
1/2 jar of rose jam
1 or 2 tbsp cinnamon or cardamom, ground 
Pinch maldon salt
2 or 3 tbsp icing sugar

Instructions

Prepare a bowl of acidulated water (cold water with lemon juice) to prevent browning.
Core the apples, and cut them in quarters. Slice thinly into half-moons (a mandolin is useful for this). 
Put them into a large bowl of cold water with the lemon.
Microwave the bowl of sliced apples for 5 minutes until soft enough to bend slightly but not cook them.
Preheat the oven to 180ºC.
Roll out the puff pastry. Divide into 8 sections by cutting the roll into quarters then halving each quarter. You will end up with 8 approximately 6cm strips.
Brush the strip with melted butter then paint with a layer of rose jam. You can then dust with either ground cinnamon or cardamom.
Lay the apple slices along the top of the pastry strip, overlapping them. Fold up the bottom half of the pastry strip to make an pleat with the skin side of the apple half moon poking over the top.
Roll up the folded pastry strips until they look like a rose made of apple at the top
Place ‘rose’ side up, in a buttered cupcake tin
Repeat until all are done and bake for 20 -30 minutes.
Using a tea strainer or small sieve, sprinkle with icing sugar.
A lovely vegetarian recipe from @lulugargari - a g A lovely vegetarian recipe from @lulugargari - a green bean and basil pesto with Italian lemon 🍋 pasta. Fresh, light. This was at an Italian cooking class/demo @eatalylondon hosted by @ilovefruitandvegfromeuropecouk @flickflock #london#italy🇮🇹
Digital chefs came from Italy yesterday to teach h Digital chefs came from Italy yesterday to teach how to make pumpkin, chilli, taleggio fondue Paccheri pasta- warming and filling for autumn days. Thanks to @ilovefruitandvegfromeuropecouk @flickflock @eatalylondon @danielerossichef @lulugargari for the event. We then got to go shopping in Italy with a £50 voucher. I spent it on mostardi di frutta, burratta, carciofi, cheeses,. My sis in law @bro0907 spent it on two bottles of wine. 😂 #italianfood #italianingredients #cookingclass #campaniafood
Inspired by @kathybrownstev’s book on edible flo Inspired by @kathybrownstev’s book on edible flowers I did an edible flower supper club featured in my first book ‘supper club’ This weekend I briefly visited her garden. Decades of work and creativity went into creating this English oasis. It’s an hour and a half out of london near Bedford. It closes at the end of September: open Tuesdays and this coming weekend. It was odd to go on holiday so near to where I live! We had a beautiful Airbnb in Pavenham. The countryside starts nearer to home than I thought. #uk #england #gardens
Visited The speciality fine food fair today for th Visited The speciality fine food fair today for the first time. So many tastings! Great to see new products. Particularly impressed by @lamiriharissa which is smoked and delicious run by Jo Lamiri’s children and @quirkymonkeycoffee which is mushroom infused coffee and hot chocolate run by an autistic guy Darwin setting up his own business. Good for him. #foodexplorer
Bones and all. Just made tomato sauce pasta from m Bones and all. Just made tomato sauce pasta from my home made sun dried tomato concentrate made @tenutacammarana in Sicily last summer. It’s the taste of sunshine. Plus my English home-grown tomatoes. #Tomatoes 🍅 🍅 🍅 #dinner #babyledweaning
I’ve made a South African/ Botswana dish that is I’ve made a South African/ Botswana dish that is creamy samp with chakalaka. Samp is corn like hominy or pozole a native Indian or Mexican food. It’s strange that it’s a staple food in Africa. Corn is a new world food I think. Samp itself is quite bland, often eaten with beans. Chakalaka is delicious with peppers, Piri piri seasoning, ginger garlic onions tomatoes and carrots and baked beans.
Samp from Botswana. It’s husked corn and makes a Samp from Botswana. It’s husked corn and makes a porridge like carb- creamy samp. I’m rinsing, soaking and cooking today and will combine it with chakalaka tomorrow. #southafrica #botswana #samp #newworldoldworld
Did my living room floor with @woca_denmark_uk_ire Did my living room floor with @woca_denmark_uk_ireland natural floor soap yesterday which smells lovely. But high traffic areas need rewarding. This is a Scandinavian technique- regularly waxing pale wood floors. I did this floor during the first year of lockdown. I prefer waxed floors to varnished. #interiors #woodfloors
Alliums in a purple pot. Note to self: plant more Alliums in a purple pot. Note to self: plant more bobble headed alliums. Love the colour and shape. This is in a neighbours garden who I met on Saturday while working in the front garden. Traditionally the British have front gardens but now they are turned into driveways and building are developed into flats. Only very rich people in london can afford houses. But the front is very important for the community- it’s how you meet your neighbours. On Saturday I visited 2 different sets of neighbours gardens- the first time since I moved to this street 23 years ago. Our front garden is communal and has been an unloved space- I’m trying to change that. Tonight I cleaned all the wheely bins. A yucky job but otherwise they smell so bad in summer. I was thinking about all the terrible dirty jobs that someone has to do- clearing up after a road accident, or sorting out sewers, or unblocking toilets. The stuff that nobody likes to think about. #frontgardens #neighbours #londoners
What I’ve been up to: awning from @victorianawni What I’ve been up to: awning from @victorianawnings which has transformed our al fresco eating possibilities. Also been working on the front garden of our building using talented work men I found on fb marketplace: railings by @lincsecproducts ( the gates were bought by me some years ago and I’ve scraped off the rust and repainted), the arch, which took me 3 years to find on fb marketplace for the right price and size. The wisteria which will grow over the arch planted by @christina_erskine ( I’ve always wanted a wisteria and they apparently add to the value of your house), the Swiss style bike/buggy shed. Needs to be painted dark green to match the walls. My friend Jim repaired the walls, the coping, and laid the  concrete plinth. Now need to find coping for the pillars or perhaps urns for more plants. 47cm2. #interiors #exteriordesign #gates #railings #bikeshed #awning #design
Made a vegetarian paella with La bomba rice from @ Made a vegetarian paella with La bomba rice from @brindisaspanishfoods I used red and green peppers, saffron, sherry, Nyora peppers, smoked almonds and green olives #vegetarian #vegetariansummer #paella
Quick snap of my bedroom chimney wall with the @sa Quick snap of my bedroom chimney wall with the @sanderson1860 wallpaper - finally done. Never wallpapered before. By the way I’m totally open to interiors collaborations email me: marmitelover@mac.com #interiordesign #wallpaper #london
Cooking powders or flavour bombs: two of my favour Cooking powders or flavour bombs: two of my favourite are ‘chaat’ which you can buy in Indian shops- here I’ve sprinkled yoghurt with lime/achaar chaat and decorated with day lily petals. My other favourite culinary powder is @tajinuk which gives instant mexicanness to any dish. #tajin #chaat
Me and my beautiful granddaughter Ophelia. I look Me and my beautiful granddaughter Ophelia. I look a mess ( really need to dye hair but it’s sooo expensive) but I don’t care because my heart just bursts when I cuddle this little being who has been in my life for 8 months. Babies are a blessing. #granfluencer pic: @clairebelljar
Made arepas last week with masarepa, a precooked m Made arepas last week with masarepa, a precooked maize meal, topped with Wensleydale cheese which isn’t too dissimilar to a fresh Latin American cheese. I also added fresh corn kernels for texture. #colombia #venezuela #arepas #vegetarian
Quinoa salad cooked in a mushroom stock cube solut Quinoa salad cooked in a mushroom stock cube solution with hazelnuts & preserved lemons, home grown curly parsley. I’m not cooking most of my grains in a rice steamer. Turn out fluffy & perfect every time. #quinoa #grainbowl #summerfood
I took this photo of Jane Birkin when she performe I took this photo of Jane Birkin when she performed at @theroundhouse in 2008. Shabby chic with a sweet voice. #RIP #janebirkin #concert #london #rockphotographer
Oxford food symposium 2023 lots of talks, meals an Oxford food symposium 2023 lots of talks, meals and drinks
‘Soft serve’ ice cream. Easy! Add condensed mi ‘Soft serve’ ice cream. Easy! Add condensed milk & vanilla to whipped cream and freeze! Pipe out. Buy a flake if you want a 99. #nochurnicecream #99 #icecream #summer23
Load More... Follow on Instagram

Archives

Copyright © 2023 msmarmitelover