• Facebook
  • Instagram
  • Pinterest
  • Snapchat
  • Twitter
  • YouTube
  • Skip to primary navigation
  • Skip to main content
  • Skip to primary sidebar

MsMarmiteLover

  • Food
    • Recipes
    • Vegetarian
    • Vegan
  • Travel
    • France
    • Italy
    • Spain
    • UK
  • Wine
  • Gardens
  • Supperclubs/Events
  • About
    • Published Articles
    • Books
  • Shop
    • Cart

How to graft your own tomatoes for disease resistance

April 18, 2012 Leave a Comment Filed Under: Uncategorized

Grafted tomato plants are beginning to become available to the home gardener. A grafted plant will have the roots and lower stem of one plant, with upper stem, leaves and fruit grafted on to it to create one new plant.
The idea behind grafting tomatoes is that the roots and lower stem (called the rootstock) will be from a disease-resistant variety; the top part of the new plant (called the scion) will be from a variety bearing highly flavoursome fruit. You, the grower, gets the best of both worlds: plenty of delicious fruit on a disease-resistant plant. As heritage tomatoes have become more popular, gardeners have also had to accept that heirloom varieties are also more prey to diseases such as tomato blight.
Grafting is a long established practice in the world of fruit trees, where the rootstock chosen will often determine the size of the tree. That’s how you get dwarf apple and pear trees where you don’t need a ladder to reach all the fruit.
It’s becoming more widely practised for other fruit as well, but particularly tomatoes.
The downside is that grafted tomato plants aren’t yet widely available and they are more expensive than ordinary plants. Also, the variety of tomato that you want to grow may not be available in grafted form.
So why not graft your own?
It’s not really difficult and only requires one piece of inexpensive specialist equipment – the grafting clip.You’ll also need a sharp blade – a scalpel is ideal, and a clean work surface. We obtained ours from Heirloom Tomatoes in north Yorkshire – they also sell a wide range of tomato seeds, plants and other tomato-related supplies.

Grafting tools. You will need: 1) your rootstock tomato seedling, which will form the roots of the new plant, 2) the ‘scion’ tomato seedling, which will be the top, fruiting part of the plant, 3) a very sharp clean knife such as a scalpel, 4) grafting clips and, 5) a pot to put your grafted tomato plant into.

The best time to graft tomatoes is when they are still small, at seedling stage. Seedlings work best because the smaller the cut, the quicker and better it heals. For a commercial nursery, early grafting means the space saved (by making two plants into one) can be used for something else.
So, you have your rootstock on one side, the plants that will be the scions on the other. Keep them separate, you don’t want to mix them up. Varieties such as Maxifort or Aegis are grown specifically to provide rootstocks for grafting. They are vigorous, disease-resistant plants. Don’t grow them for the fruits – they’re pretty much inedible by all accounts and the plant runs riot. I doubt you’ll find Maxifort or Aegis in garden centres – try online (Heirloom Tomatoes are, again, a good starting point).

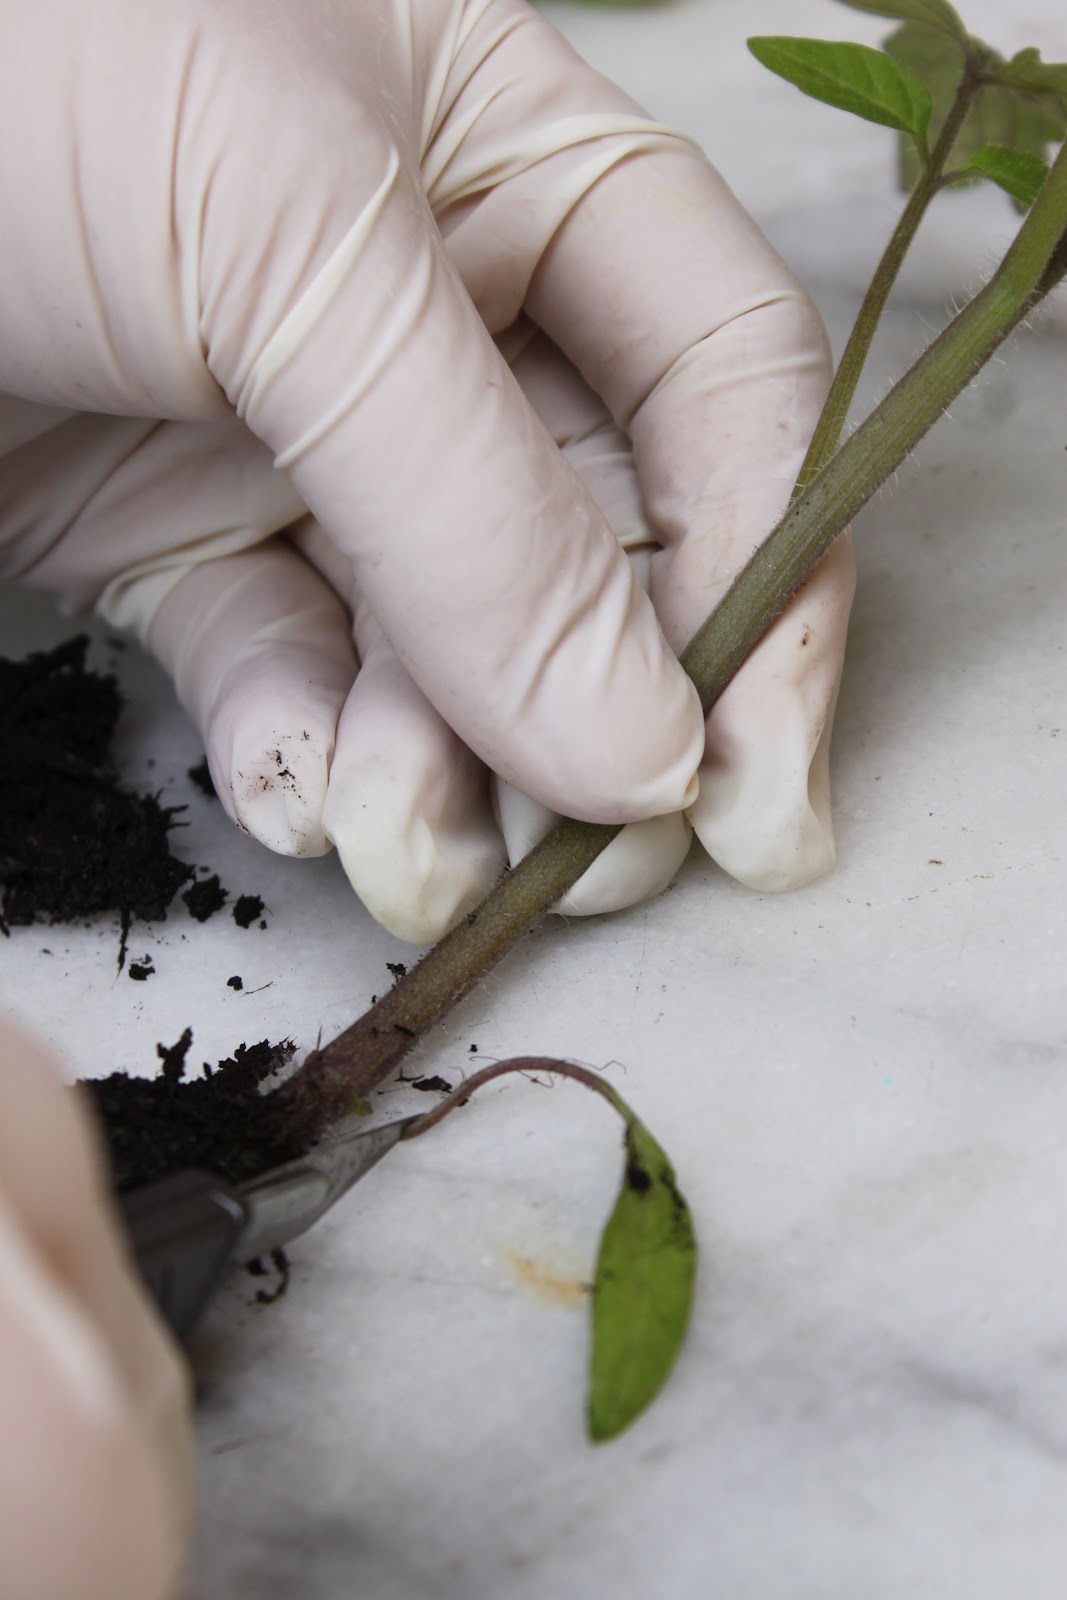
1. Take the rootstock plant (the blight resistant/bottom half) out of the pot, and remove surplus soil. 
2. Remove – as cleanly as possible, this is why you need a very sharp blade – the baby leaves and the top leaves, leaving as long a stem as possible.
3. Take the scion (the fruiting/top half), and remove the baby leaves and a couple of the lower leaves, leaving just the top growth.
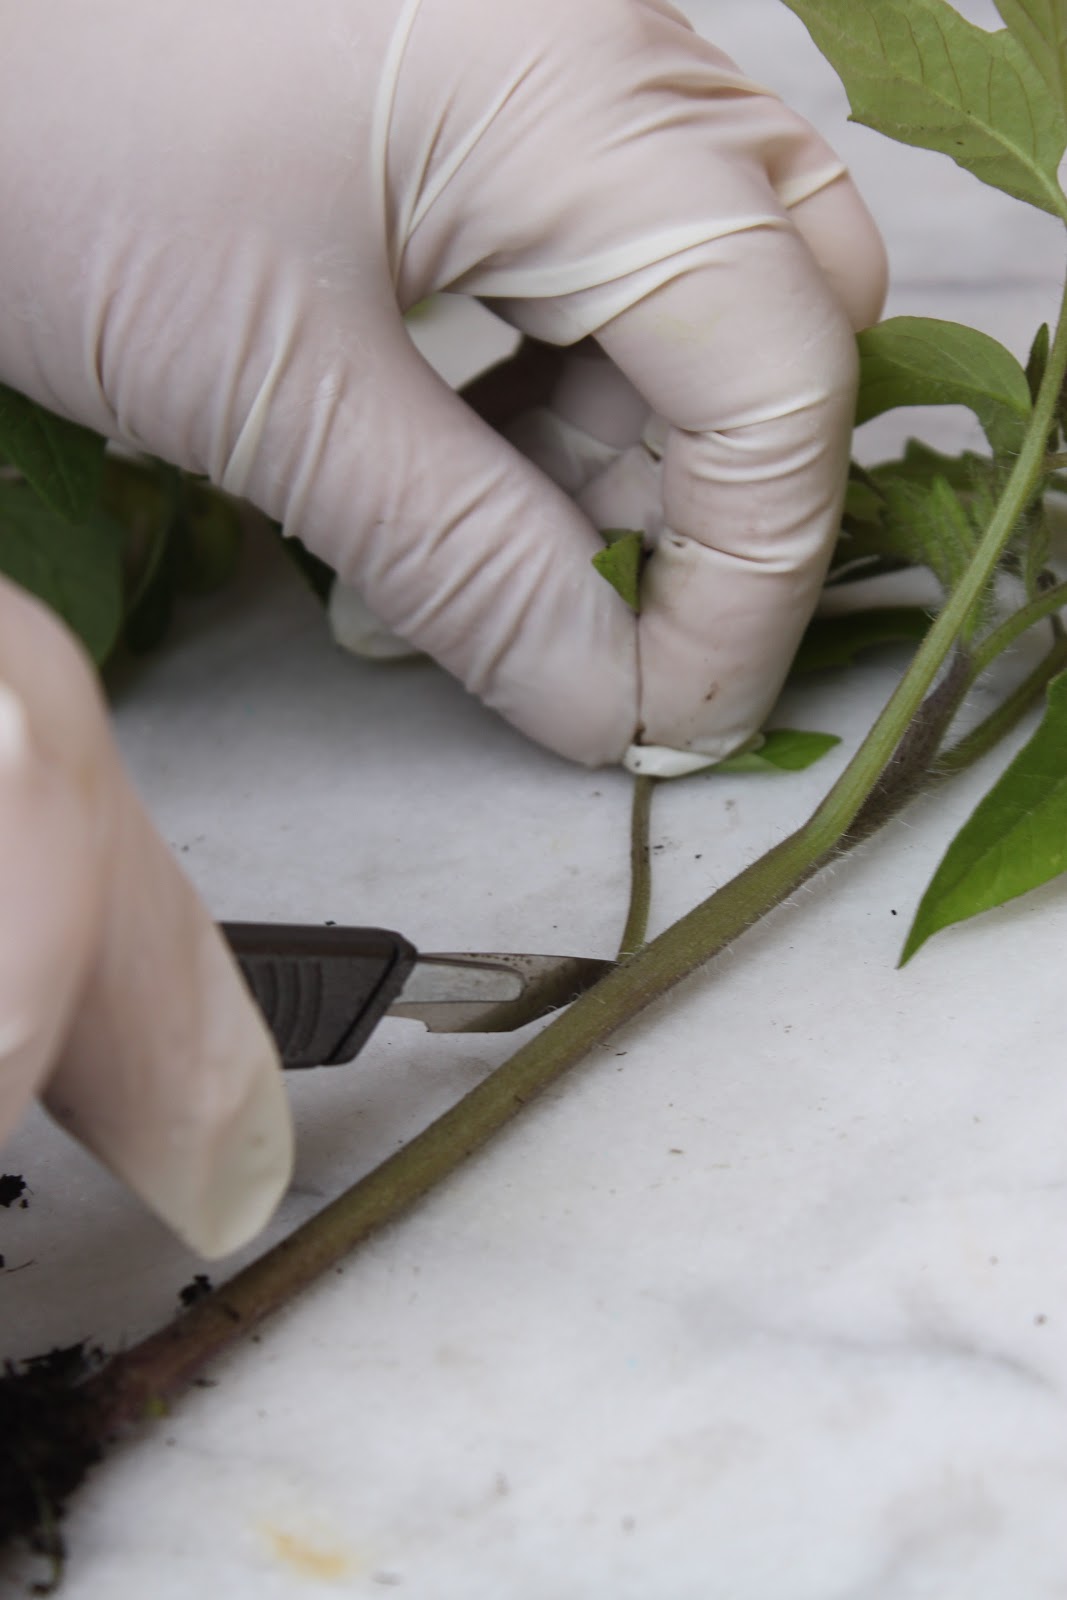
4. On the rootstock, cut a downward notch in the stem. Slice about a third of the way in so that you have a fleshy slice of stem either side of the cut. Make a corresponding  upward cut in the scion.
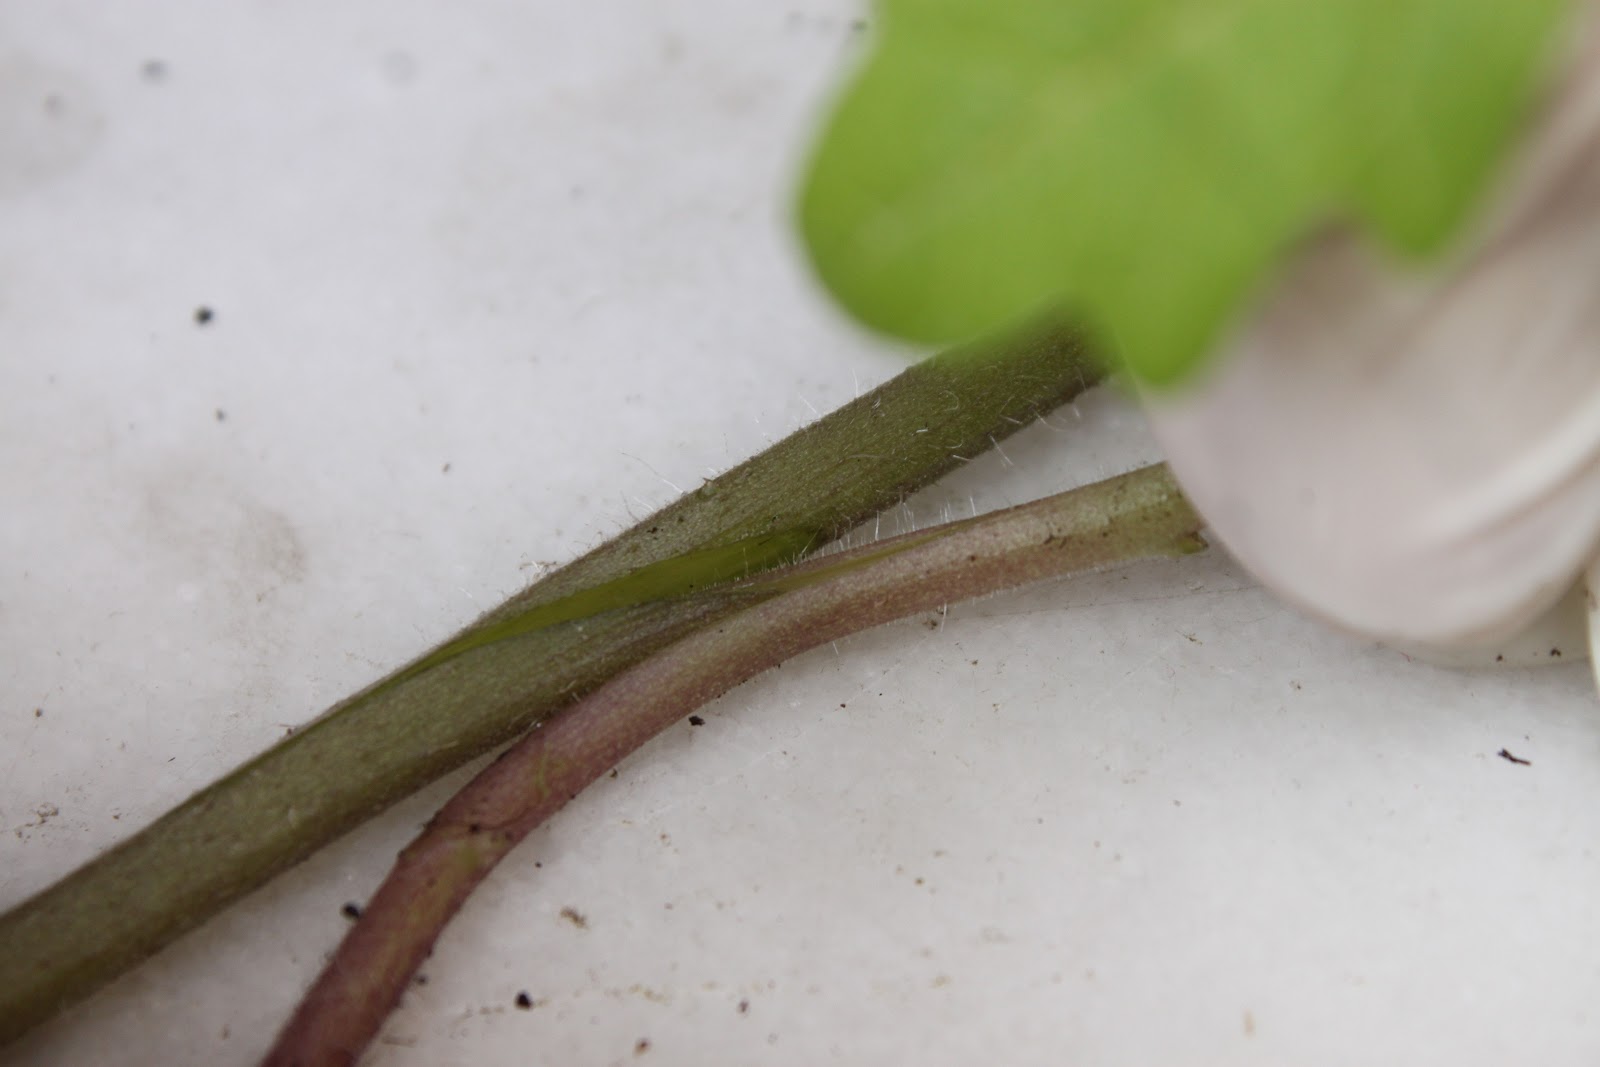
5. Now fit the two together, so that the protruding scion slice fits into the rootstock cut. 
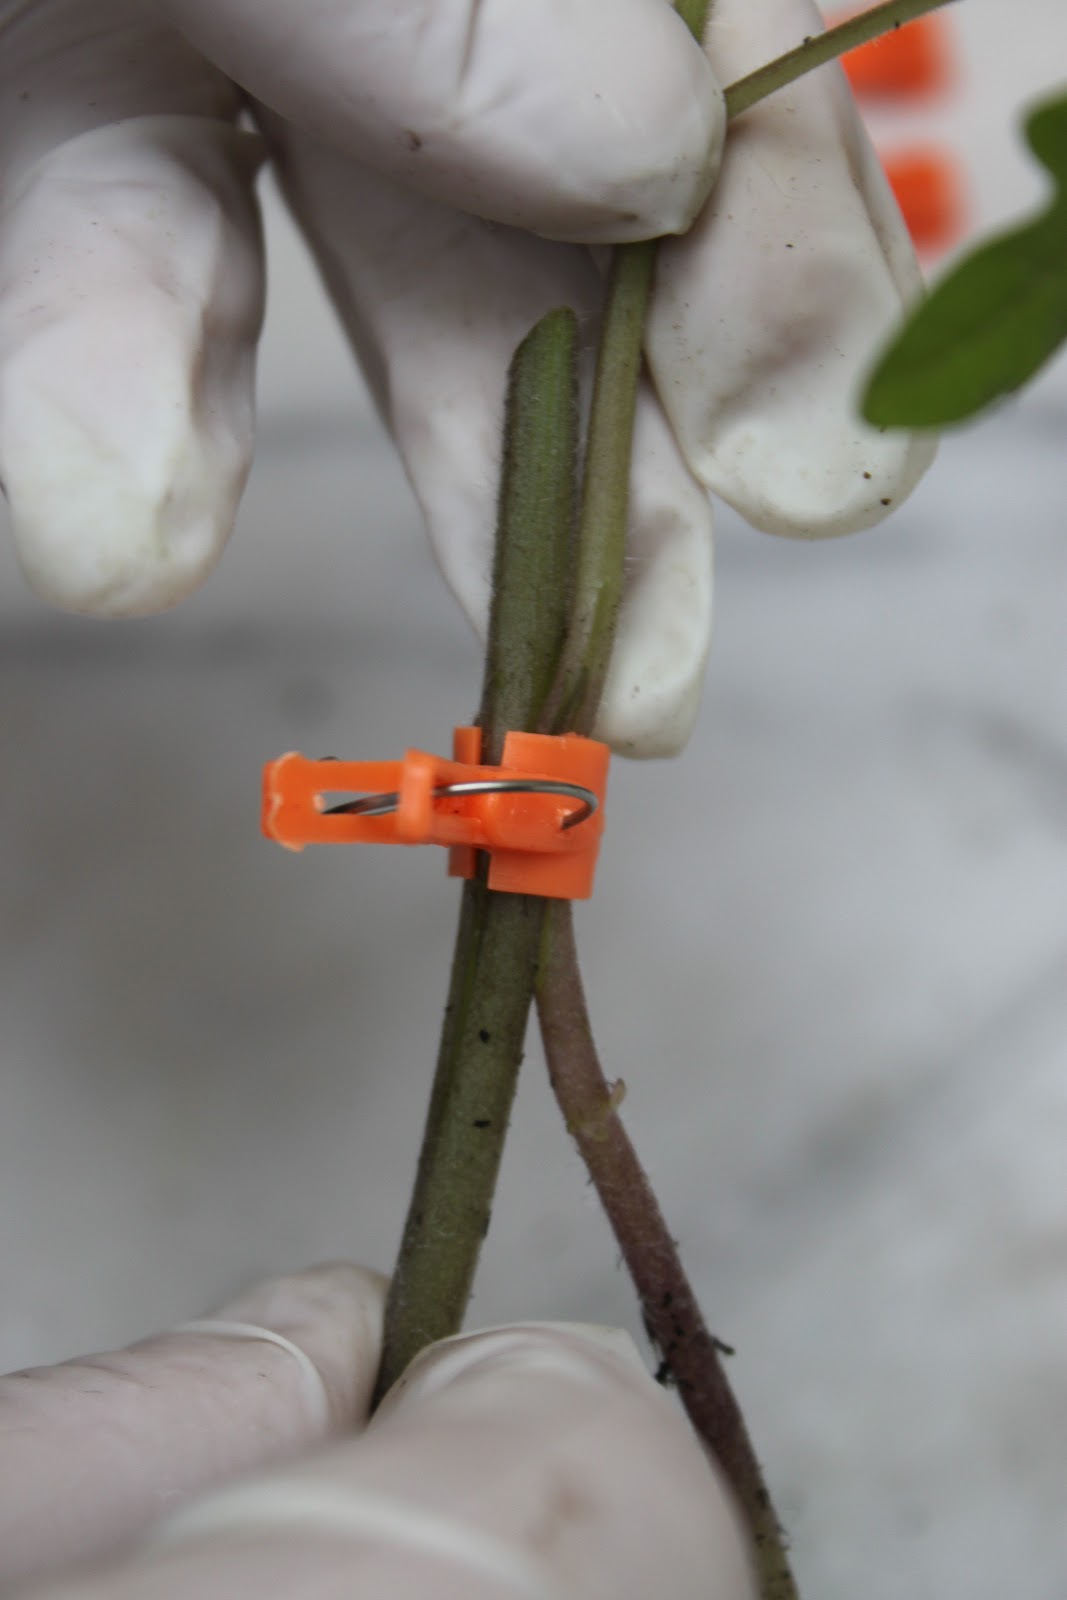
6. Take a grafting clip and clip the wound together, making sure the cut sides fit together snugly. 
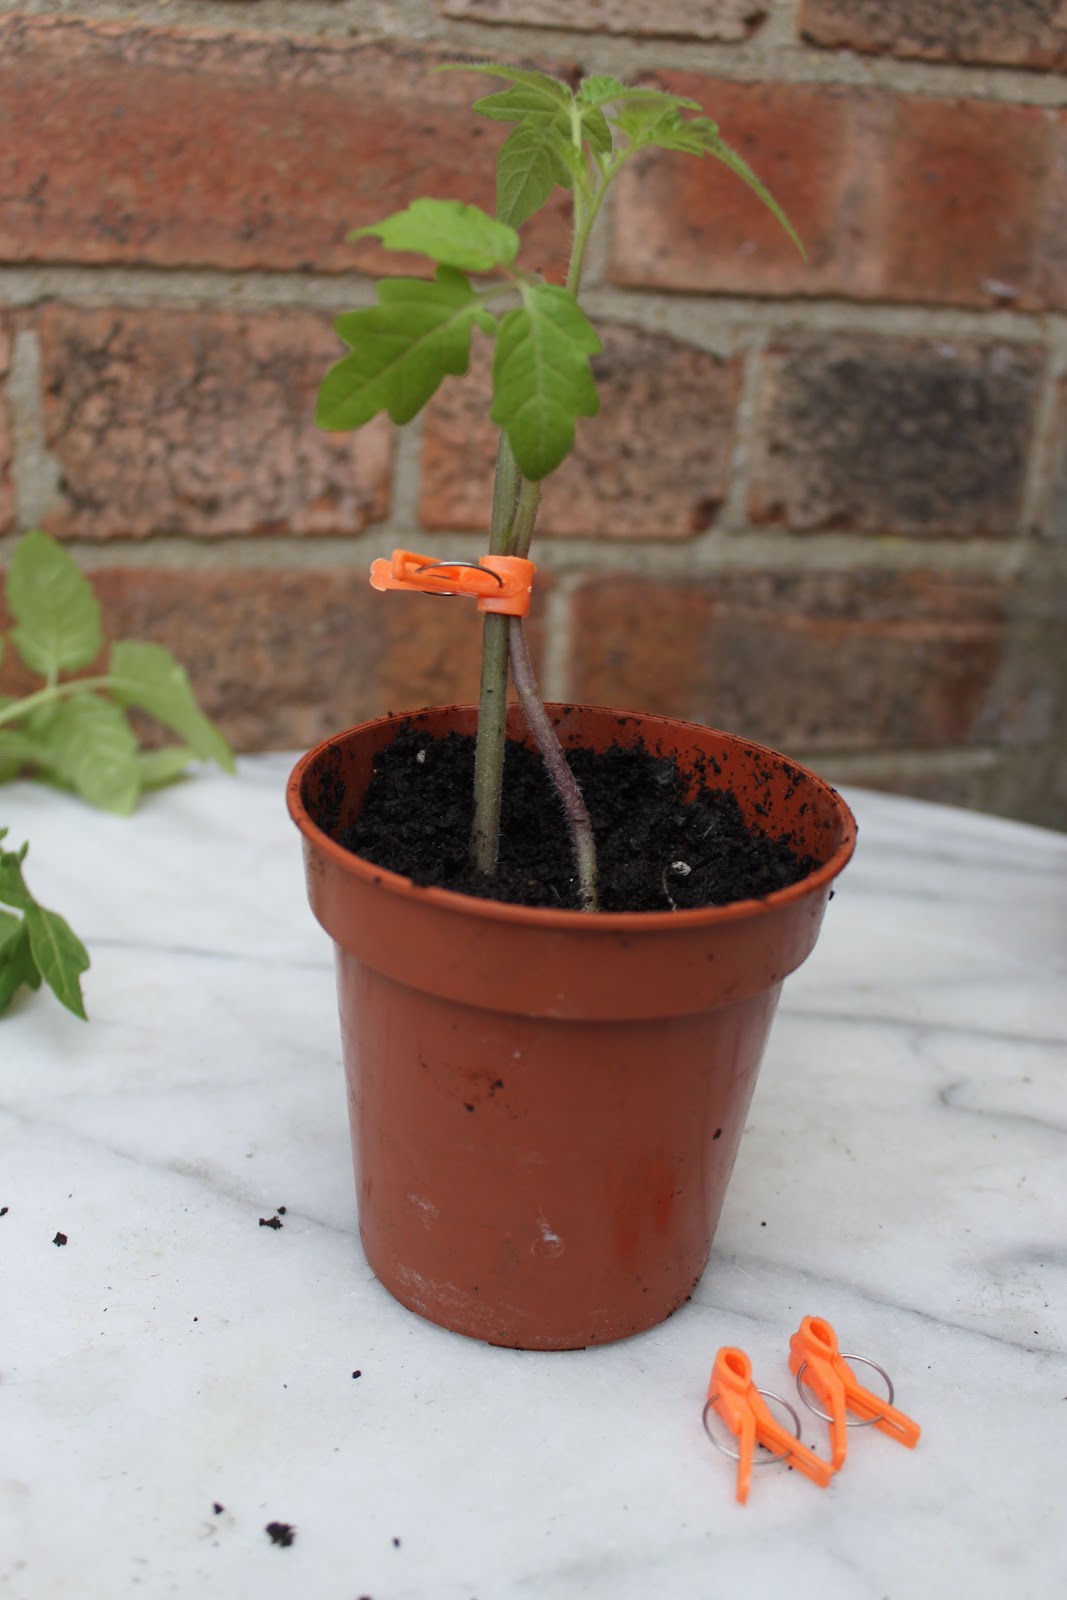
7. Gently put the grafted plant back into the pot, with both rootballs covered. 
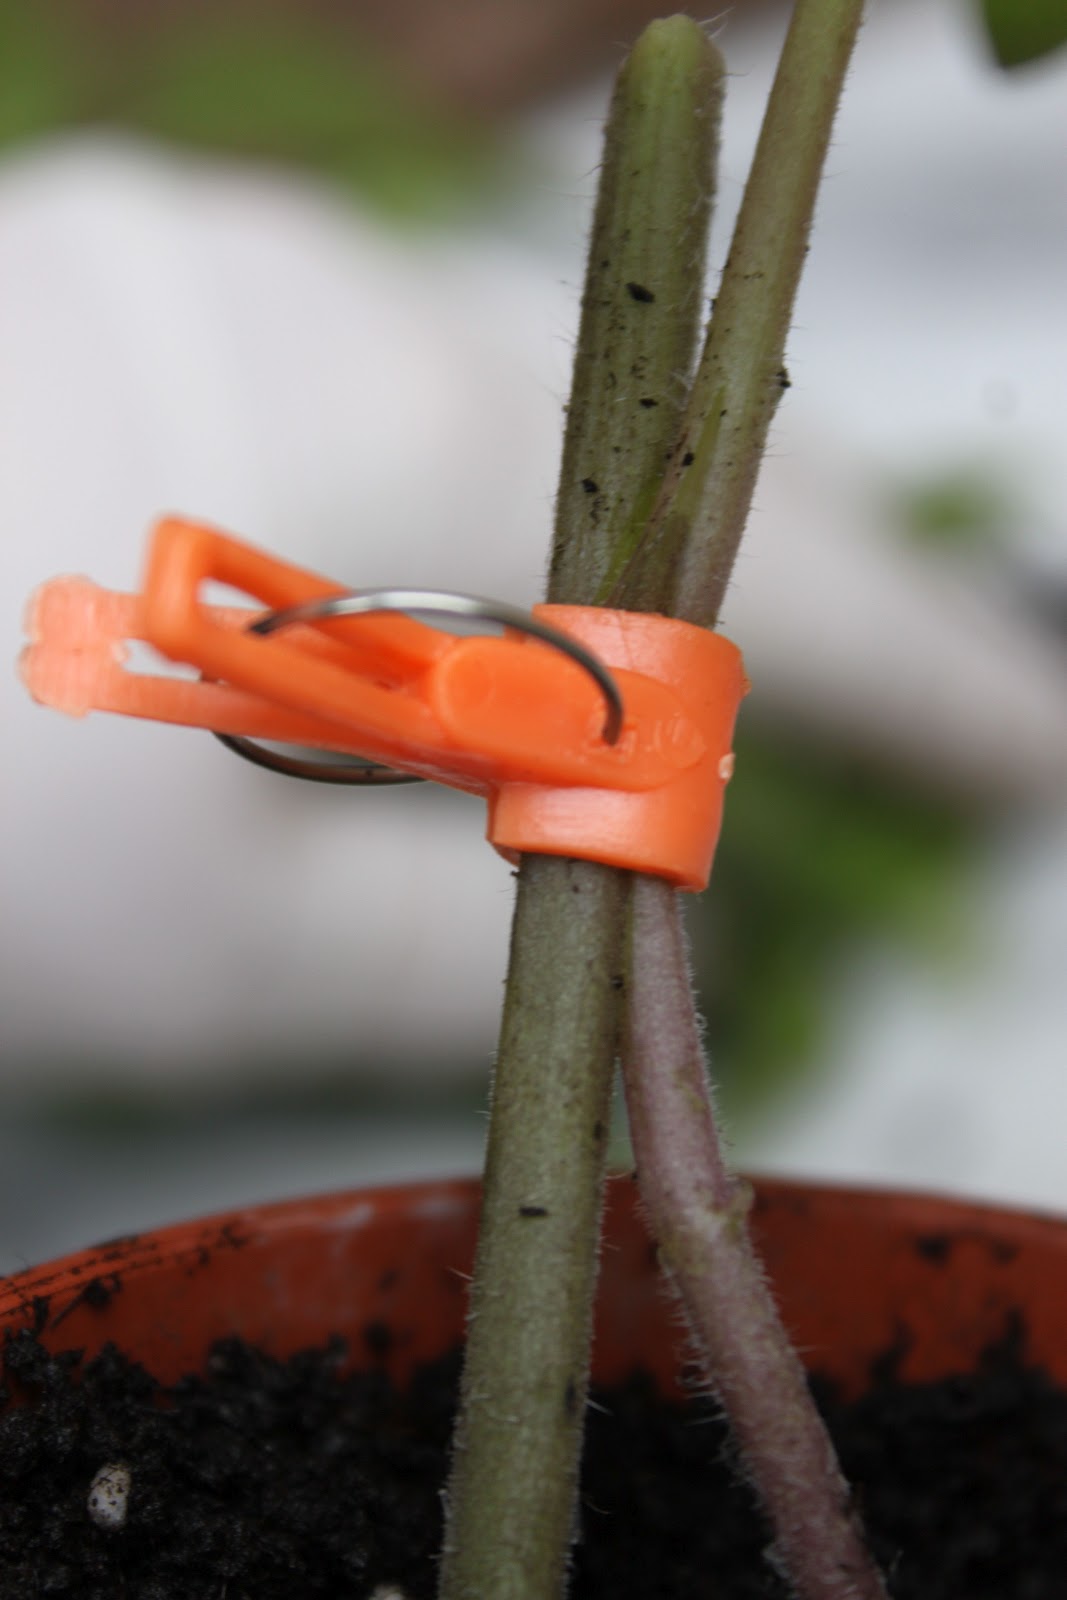
8. The grafting clips apply just enough pressure to keep the cut sides pressed together without damage the plant tissues.

Leave the new plant somewhere sheltered, out of direct sunlight, for a 3-4 days until it recovers from what is effectively major surgery.

After 3-4 days, you should see that the graft has taken and you can remove the grafting clip – and reuse it of course.
In the next few days after that you should see signs of new growth on the scion. That means it’s time to complete the graft by separating the scion from its own rootstock.
Cut the bottom off the scion just below the graft, so that the top plant is now being fed only by the rootstock.
The top of your tomato plant is now fully grafted to the rootstock. Keep the grafted plant in its pot for a couple of weeks until you can see really strong top growth. Then pot it on, or plant it out as usual.
You should find you have a vigorous, more disease resistant tomato plant.

You can also see how to graft tomatoes on this excellent video from the University of Vermont. This also shows the same grafting process for aubergines as well as two different ways to graft tomatoes.

To buy your grafting kit go here.

Recent posts

Soup recipes for a broken arm

February 26, 2025

The future of farming

January 20, 2025

Poppy seed kifli pic: KERSTIN RODGERS

Hungarian poppy seed pastry ‘Kifli’ recipe

November 5, 2024

Previous Post: « Tomatoes, peppers, aubergines, and courgettes – the best of Mediterranean vegetables
Next Post: Sherry and tapas in Jerez »

Reader Interactions

Leave a Reply Cancel reply

Your email address will not be published. Required fields are marked *

Recipe Rating


Primary Sidebar

MsMarmiteLover aka Kerstin Rodgers.

Chef, photographer, author, journalist, blogger. Pioneer of the supperclub movement.

This is my food and travel blog, with recipes, reviews and travel stories. I also stray into politics, feminism, gardening.

Kerstin Rodgers/MsMarmiteLover

msmarmitelover

Went with influencers to @standrewslakes in Kent w Went with influencers to @standrewslakes in Kent with @ourfinland @lakelandfinland @pcagency to experience Finnish food such as Karelian pies with egg butter, cinnamon buns, blueberry pies, and pea soup which they have with mustard and sour cream. We did zip lining, kayaking, saunas, whipped ourselves with birch sticks, ate in a gorgeous wooden bbq shed @arctic_cabins at the end of all this activity we were all tired but happy. @miramakeup @holidaywiththeheathers @amie_jane__ @onehungryasian @iamtimchung @travellingtuesdays @charlotteemilyprice #presstrip
@camille.osullivan @camilleosullivanpics and @grah @camille.osullivan @camilleosullivanpics and @grahnort @wiltonsmusichall god this woman is talented. She did a solo show of The Rape of Lucrece. Her voice! #theatre #shakespeare #london
My latest article on Hungarian cuisine, a unique m My latest article on Hungarian cuisine, a unique meeting of east and west, for @ckbk It's a blend of Ottoman, Eastern and middle European, Austro-Hungarian empire and cowboy food. #food&travel #foodanthropology #hungary
Made Fermented Cucumber dill pickles from @nickvad Made Fermented Cucumber dill pickles from @nickvadasz book The Pickle Jar. At @katzsdeli in New York they sell half sours and full sours. I reckon these are 3/4 sour. The white mould is fine btw. These are delicious #pickleperson #fermentation #guthealthy
London in bloom: wisteria, cherry blossom, lilac, London in bloom: wisteria, cherry blossom, lilac, plum blossom, 🌸 you don’t need to go to Japan for the Sakura season- it’s all here- london at its most beautiful. #london
Bluebell walk on Wanstead flats. The scent is incr Bluebell walk on Wanstead flats. The scent is incredible: similar to lily of the valley. These are actual English bluebells - a deeper colour & more delicate than Spanish bluebells which are rather invasive. #london #walks #april #bluebells
Snapshots from portobello rd market. Portuguese fo Snapshots from portobello rd market. Portuguese folar de pascua bread from Lisboa patisserie,  a gorgeous mosaic table from Fez, my favourite antique shop @muirshindurkin, Alice’s shop, an Easter hat, the best wisteria I wrote a substack on portobello road: https://open.substack.com/pub/kerstinrodgers/p/where-to-go-in-portobello-road-the?r=3873k&utm_campaign=post&utm_medium=web&showWelcomeOnShare=true #london
I visited @tokyobagellondon with my granddaughter I visited @tokyobagellondon with my granddaughter yesterday to try one of their viral wobbly bunnies. We also tried the multi layer Oreo pancake cakes, the onigiri shaped croissant. My sister had the black sesame latte and I had yuzu tea. I spent £35 in a short space of time as each dessert was £5 but it was a fun experience. Ophelia said ‘lovely flowers’ which shows a degree of sophistication for a 2 year old. I preferred the strawberry to the coconut flavour . #londondaysout #grandmacore #easter
A quick high protein lunch of ratatouille with smo A quick high protein lunch of ratatouille with smoked tofu.  @pomoragoodfood olive oil then an aubergine cut into thick slices then quartered. Fry till translucent then add the chunks of red pepper. 2 fat garlic cloves sliced thinly, a block of smoked tofu in chunks, 2 bay leaves, a small handful of maldon salt. A courgette cut into thick half lengthways- then sliced into half moons. I might chuck in a handful of pantelleria capers in vinegar to give some acidity. Serve hot or cold. #sololunch #protein #vegetables
Inspired by @nickvadasz book The pickle Jar I used Inspired by @nickvadasz book The pickle Jar I used his dill pickles to make one of my favourite recipes for lunch - a potato, sour cream & pickle soup. Recipe on the blog. #soup #pickles
One of my favourite ways to eat mushrooms. Cook wh One of my favourite ways to eat mushrooms. Cook whole button mushrooms in olive oil, lemon juice, a little white wine vinegar, salt, bay leaves, whole coriander seeds, thyme, and white wine if you have it to hand. I used @pomoragoodfood olive oil. You can eat it straight away or leave it to marinate longer and eat the next day. #vegetarian #vegan #mushroomrecipe
Table side Caesar salad @maisonfrancois for @sienn Table side Caesar salad @maisonfrancois for @siennamarla birthday 🎂 #london #restaurants #caesarsalad
I went to sheffield to visit the @reclaimedbrickco I went to sheffield to visit the @reclaimedbrickcompany to look at their hand cut, wire cut and tumbled bricks for a herringbone patio. I love the historical aspect of bricks, the different quarries from different parts of the country. #patio #englishhistory story
Made brussel sprouts with pistachio pesto. The pis Made brussel sprouts with pistachio pesto. The pistachios came from Brontë in Sicily- they are the best pistachios in the world. You can make pesto with any nut: it’s usually with pine nuts but I’ve used hazelnuts, almonds (trapani), walnuts. #vegetarian #pesto #bronte
Bathroom palette: @firedearthuk scallop tiles @top Bathroom palette: @firedearthuk scallop tiles @toppstiles honed white marble skirting and dado @paintandpaperlibrary paint @sanderson1860 wallpaper this is my first rodeo when it comes to bathroom design. Follow my progress
Yesterday I cooked ( needed help with heavy pans a Yesterday I cooked ( needed help with heavy pans and pouring) pesto alle genovese. Made pesto in the vitamix: fresh basil leaves, 4 cloves garlic, 100g pecorino, 100g pine nuts, 150ml olive oil, salt, and juice of half a lemon. Whizz up.  Then cook the pasta - traditional shape is trofie but I only had fusilli. Top with small boiled potatoes and steamed green beans. Douse again with olive oil and more pine nuts. I served this with green salad with cucumber, avocado, pumpkin seeds and a mustard lemon olive oil dressing. #familylunch #sundaylunch #pestopasta #pestgenovese
Unstyled food photos no.4: butternut squash soup. Unstyled food photos no.4: butternut squash soup. Peel and cut up the butternut squash. Discard the seeds. Roast with olive oil, salt, smoked paprika in the oven for 30 minutes. Soften 2 brown onions in a deep pan with olive oil, add 3 cloves garlic minced, 3 bay leaves. Then add the veg stock powder and 1.5 litres hot water to the pan. Stir. Pour in the roast butternut squash. Cook for 10 minutes. Then remove the bay leaves and blend. Add 3 large scoops of natural yoghurt or skyr. Season to taste. Transfer back to the deep pan and serve with grated cheese, pumpkin seeds, chilli. 🌶️ #vitamix #soup #winterfood #agacooking
Unstyled food photos #3: roast cauliflower & garli Unstyled food photos #3: roast cauliflower & garlic cheese soup. Roast the cauliflower florets, unpeeled garlic cloves, one chopped brown onion in olive oil. Once golden, tip into a saucepan with a potato chopped small, 3 tbsps veg stock and 1.5 litres hot water. Boil till soft the. Add 100g cheddar. Stir then blend in a blender. Serve with grated cheese on top. #soup #vitamix #winterfood #cookingwithonehand #simplerecipes
Unstyled food photos: whole roast cauliflower with Unstyled food photos: whole roast cauliflower with ground almond crust, yoghurt, cumin, lemon juice and tahini sauce using @pomoragoodfood olive oil. First I parboiled the cauliflower then roasted it for 30 to 30 minutes with salt and olive oil in the oven. Add the ground almonds and bake for another 10 minutes. Then serve hot with the sauce. #highprotein #lowcarb #vegan #vegetarian #glutenfree
Unstyled food photos: carrot and preserved lemon s Unstyled food photos: carrot and preserved lemon soup. I’m eating a lot of soup as it’s easy to make with one hand and a vitamix. I roasted the carrots ( 1 kilo) in olive oil. Then boiled them with 2 tbsp veg stock, 1 tsp ground coriander, 1 tsp ground cumin and 2 litres hot water. For a thicker soup, add 1 tbsp of cornflour mixed with the stock juice and add. Once tender, I blended this with 2 whole preserved lemons, adding a little of the juice from the jar. Blend on medium then high. Serve with yoghurt. It’s a way of effortlessly eating a lot of vegetables in one meal. #winterfood #soup #vegetables
Load More... Follow on Instagram

Archives

Copyright © 2025 msmarmitelover